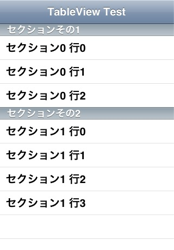
Table View の勉強01〜とりあえず表示させるまで
手順
1.SingleView-Applicationでプロジェクト作成
2.StoryboardからTableViewControllerを追加
3.下記を参考にTableViewControllerのソースを追加し、Storyboardと関連付ける
Xcode4.4でViewControllerを追加する方法 - yamekodevの日記
4.Navigationコントローラを組み込む
方法:Storyboardから、メニュー -> Editor -> Embed In -> Navigation Controller
5.ソースを書き換える
注意
・テーブルの表示内容の設定は、Storyboardではなく完全にコーディングのみによって行う。
・Storyboardとヘッダファイルの結びつけは、今回は不要
(AssistantEditorを使わない)
ソース
※コーディング部分のみ抜粋
TableViewController.m
- (void)viewDidLoad
{
    [super viewDidLoad];

    self.title = @"TableView Test";
}

- (NSInteger)numberOfSectionsInTableView:(UITableView *)tableView
{
#warning Potentially incomplete method implementation.
    // Return the number of sections.
    return 2;
}

- (NSInteger)tableView:(UITableView *)tableView numberOfRowsInSection:(NSInteger)section
{
#warning Incomplete method implementation.
    // Return the number of rows in the section.
    if(section == 0) {
        return 3; // 1個目のセクションのセルは3個とします
    }
    return 4; // 2個目のセクションのセルは4個とします
}

// セクションのタイトル表示設定
- (NSString *)tableView:(UITableView *)tableView titleForHeaderInSection:(NSInteger)section {
    switch(section) {
        case 0: // 1個目のセクションの場合
            return @"セクションその1";
            break;
        case 1: // 2個目のセクションの場合
            return @"セクションその2";
            break;
    }
    return nil; //ビルド警告回避用
}
- (UITableViewCell *)tableView:(UITableView *)tableView cellForRowAtIndexPath:(NSIndexPath *)indexPath
{
    static NSString *CellIdentifier = @"Cell";
    UITableViewCell *cell = [tableView dequeueReusableCellWithIdentifier:CellIdentifier];

    // Configure the cell...

    //どこのrow(行、セル)への書き込みなのかが不明のため(?)コメントアウト
    //cell.textLabel.text = @"hoge";

    // 古い書き方(&自動的に生成済み)のためコメントアウト
    // UITableViewCell *cell = [tableView dequeueReusableCellWithIdentifier:@"Cell"];

    if (cell == nil) {
        // autolrelease is unavailableエラーのためコメントアウト&修正
        // cell = [[[UITableViewCell alloc] initWithStyle:UITableViewCellStyleDefault reuseIdentifier:@"Cell"] autorelease];
        cell = [[UITableViewCell alloc] initWithStyle:UITableViewCellStyleDefault reuseIdentifier:@"Cell"];
    }
    if(indexPath.section == 0) {
        // セクション番号と行番号によって個別に文字列を設定する方法
        if(indexPath.row == 0) {
            cell.textLabel.text = @"セクション0 行0";
        } else if(indexPath.row == 1){
            cell.textLabel.text = @"セクション0 行1";
        } else {
            cell.textLabel.text = @"セクション0 行2";
        }
    } else {
        // 文字列生成して自動的にcellに順次いれていく方法
        NSString *str = [[NSString alloc] initWithFormat:@"セクション%d 行%d",indexPath.section,indexPath.row];
        cell.textLabel.text = str;
        // release is unavailableエラーのためコメントアウト&修正
        //[str release];
    }
    return cell;
}
参考ページなど
http://d.hatena.ne.jp/moto_maka/20090122/1232568086
の方法はXcode4.4ではうまくいかなかった。
(ビルドは通るが、シミュレータ起動してアプリ実行時に「UIApplicationMainでブレークするエラー」になる)
調べた結果、UITableViewの使い方その1:基本編の方法を利用するとうまくいった。
次回以降
もとまかさんのページのチュートリアルを適用させながら、TableViewへの知識を都度深めていく。
